Beginner’s Guide to Machine Learning

Machine Learning can be overwhelming for beginners. The are complicated algorithms, complex mathematical equations, different tools available, and not so well-documented examples to deal with.

What is machine learning anyway?

In the simplest description, it is a science of creating a program to learn from existing data and be able to predict a required output when fed by a new data. It is very exciting field and it is the driving force behind the widespread application of Artificial Intelligence(AI) as we know today.

Motivation

There’s a lot of application for machine learning. We may not have noticed it but we are encountering them in our daily lives. Examples would be

  • The camera in your smartphone detects your face while taking that selfie
  • Predicting the weather
  • Photo-tagging in your social network page
  • Reading the address in a mail envelope for automatic routing
  • Safety detectors in your car like lane departure, forward collision, pedestrian detection, etc..
  • Self-driving cars
  • And the list goes on…

Start learning

I created a tutorial with complete documentation and working code without the complexities of the algorithm behind machine learning. I hope with this simple guide, you will have a good head start. Check out the code at Github.

Setup Windows 10 for Machine Learning Using Tensorflow with GPU support

Using the GPU(the video card in your PC or laptop) with Tensorflow is a lot faster than the fastest CPU(processor). Even a laptop GPU will beat a 2 x AMD Opteron 6168 1.9 GHz Processor (2×12 cores total)¹. Luckily, my Windows 10 laptop has a NVIDIA GeForce GTX 1050 video card and decided to use it for machine learning while away.

Ingredients:

  1. Latest GPU driver NVIDIA GeForce GTX 1050
  2. CUDA 9.0 Toolkit
  3. CUDA 9.0 Tookit Patch 4
  4. NVIDIA CUDA Deep Neural Network library
  5. Anaconda3 v4.1.1
  6. Python 3.5
  7. Tensorflow with GPU 1.12

Instructions:

  1. Install the latest GPU driver. Reboot.
  2. Install CUDA 9.0 Toolkit
  3. Install the CUDA 9.0 Toolkit Patch 4
  4. Extract the CUDA Deep Neural Network Library to <cudnn folder> of your choice
  5. Install Anaconda
  6. Open a command prompt and set PATH for CUDA and cudnn
     SET PATH=C:\Program Files\NVIDIA GPU Computing Toolkit\CUDA\v9.0\bin;%PATH%
    SET PATH=C:\Program Files\NVIDIA GPU Computing Toolkit\CUDA\v9.0\extras\CUPTI\libx64;%PATH%
    SET PATH=&amp;amp;lt;cudnn folder&amp;amp;gt;\cuda\bin;%PATH%
  7. Reboot.
  8. Let’s create a Python 3.5 Environment. It is a good practice to create an environment for our particular need because some dependencies are only compatible with Python 3.5. We don’t want to mess up our setup when we accidentally update the root environment of Python. Open a command prompt and run code below.
    conda create -n tf-gpu python=3.5.2

    The tf-gpu is the name of our environment. You can choose any name.

  9. Let’s activate the new environment
    activate tf-gpu
    (tf-gpu) D:\&gt;
  10. After activating the environment, let’s install Tensorflow version 1.12 using PIP – Python package manager.
    (tf-gpu) D:\&gt;pip install --upgrade tensorflow-gpu==1.12.0
  11. Let’s verify the install.
    (tf-gpu) D:\&gt;python -c "import tensorflow as tf; tf.enable_eager_execution(); print(tf.reduce_sum(tf.random_normal([1000, 1000])))"

    Sample output:

    (tf-gpu) D:\&gt;python -c "import tensorflow as tf; tf.enable_eager_execution(); print(tf.reduce_sum(tf.random_normal([1000, 1000])))"
    2019-01-16 09:07:42.324696: I tensorflow/core/platform/cpu_feature_guard.cc:141] Your CPU supports instructions that this TensorFlow binary was not compiled to use: AVX2
    2019-01-16 09:07:43.288456: I tensorflow/core/common_runtime/gpu/gpu_device.cc:1432] Found device 0 with properties:
    name: GeForce GTX 1050 major: 6 minor: 1 memoryClockRate(GHz): 1.493
    pciBusID: 0000:01:00.0
    totalMemory: 4.00GiB freeMemory: 3.30GiB
    2019-01-16 09:07:43.293825: I tensorflow/core/common_runtime/gpu/gpu_device.cc:1511] Adding visible gpu devices: 0
    2019-01-16 09:07:45.237102: I tensorflow/core/common_runtime/gpu/gpu_device.cc:982] Device interconnect StreamExecutor with strength 1 edge matrix:
    2019-01-16 09:07:45.241664: I tensorflow/core/common_runtime/gpu/gpu_device.cc:988] 0
    2019-01-16 09:07:45.243892: I tensorflow/core/common_runtime/gpu/gpu_device.cc:1001] 0: N
    2019-01-16 09:07:45.247982: I tensorflow/core/common_runtime/gpu/gpu_device.cc:1115] Created TensorFlow device (/job:localhost/replica:0/task:0/device:GPU:0 with 3020 MB memory) -&gt; physical GPU (device: 0, name: GeForce GTX 1050, pci bus id: 0000:01:00.0, compute capability: 6.1)
    tf.Tensor(240.87163, shape=(), dtype=float32)
  12. Now, that Tensorflow is installed, we can now start our journey to machine learning –> deep neural network.
  13. If you don’t have a GPU that supports CUDA Deep Neural Network Library, skip 1, 2, 3, 4, 6 and replace 10 with
    (tf-gpu) D:\&amp;amp;gt;pip install --upgrade tensorflow==1.12.0

To avoid headaches in your setup, install the exact version specified in our ingredients. Been there, been that!

Unbound service randomly stops with OPNsense 18.7.9

After upgrading my home firewall/IDS to OPNsense 18.7.9, I noticed that the unbound service stops randomly at least once a day. Worst is, it may happen more than once a day! Because  unbound is my DNS resolver, previous connections are not lost. I can only find that the service is stopped when connecting to new website.

I could use the Monit service to automatically restart the unbound service but I don’t like the feeling that unbound should crash and be restarted, right?

I did not find any error on the logs why unbound is crashing so the best thing to do is to revert to previous version of OPNsense. However, only the unbound service has an issue. I want to use the latest OPNsense and other packages except unbound. Luckily, OPNsense has a tool to revert to previous version of a particular package.

Login to your OPNsense via SSH and execute the following:


opnsense-revert -r 18.7.4 unbound

This will revert unbound to version 1.7.3.

So far, unbound has not stopped working for 3 days now.

Update: unbound 1.8.1 is also stable. Tried 1.8.2 and 1.8.3 but they are both unstable.

 opnsense-revert -r 18.7.6 unbound 

Mixed mode assembly is built against version ‘v2.0.50727’ of the runtime and cannot be loaded in the 4.0 runtime without additional configuration information.

While upgrading a Windows Form application built on .NET 2.0 to 4.5, I encountered this error “Mixed mode assembly is built against version ‘v2.0.50727’ of the runtime and cannot be loaded in the 4.0 runtime without additional configuration information. at …..

The MainForm is the only one upgraded to .NET 4.5 to take advantage of the new async features and the other libraries linked to it are kept on .NET 2.0.

It took me a while to figure this out. In your application config file, add the following configuration highlighted below. Make sure that you add this just after the configSections.

<startup useLegacyV2RuntimeActivationPolicy="true">
     <supportedRuntime version="v4.0" sku=".NETFramework,Version=v4.0"/>
     <supportedRuntime version="v2.0.50727"></supportedRuntime>
</startup>


No executable found matching command “dotnet-ef”

Using the latest Entity Framework Core 1.1 is different from the previous version. I got the error “No executable found matching command “dotnet-ef”” when I run “dotnet ef migrations add Init” at the command prompt.

In order to correct this, you have to add the Microsoft.EntityFrameworkCore.Tools.DotNet Version 1.1.0-preview4-final as one of your dependencies and configure your project.json as follows


"tools": {

"Microsoft.EntityFrameworkCore.Tools.DotNet": {
"version": "1.1.0-preview4-final",
"type": "build"
}
}

Enjoy coding the latest EF Core.

JWT Bearer Token Authentication & Authorization Front-End in ASP.NET MVC – Part 1

Following the blog of Taiseer Joudeh at http://bitoftech.net/2014/10/27/json-web-token-asp-net-web-api-2-jwt-owin-authorization-server/, I was able to build a JSON Web Token Authorization Server and Resource Server in ASP.NET API 2 using Owin. It was also demonstrated in an AngularJS and of course Postman as front-end to consume the Web Api.

However, I need to use an ASP.NET MVC template provided by Visual Studio as front-end. I tried searching, but there is no clear path or complete solution on how to attain this. So I decided to come up on my own based from incomplete answers that I found.

First of all, let’s create an ASP.NET MVC using Visual Studio. (I used VS 2015)
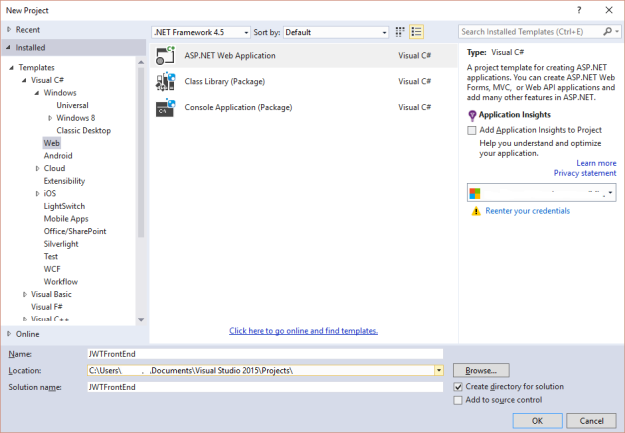
step1

Press Ok. Select MVC as template and select Individual User Accounts for the Authentication to let Visual Studio scaffold our template with login. Let’s build and run the project.

step3

The authentication uses a database. We need to customize it. As mentioned, we will use a JWT Authorization Server for authentication.

Let’s create a new folder Providers and from there create a class named JwtProvider.cs

using Microsoft.AspNet.Identity;
using Newtonsoft.Json.Linq;
using System;
using System.Collections.Generic;
using System.Net.Http;
using System.Net.Http.Headers;
using System.Security.Claims;
using System.Security.Principal;
using System.Text;
using System.Threading.Tasks;

namespace JWTFrontEnd.Providers
{
    public class JwtProvider
    {
        private static string _tokenUri;

        //default constructor
        public JwtProvider() { }

        public static JwtProvider Create(string tokenUri)
        {
            _tokenUri = tokenUri;
            return new JwtProvider();
        }

        public async Task<string> GetTokenAsync(string username, string password, string clientId, string deviceId)
        {
            using (var client = new HttpClient())
            {
                client.BaseAddress = new Uri(_tokenUri);
                client.DefaultRequestHeaders.Accept
                    .Add(new MediaTypeWithQualityHeaderValue("application/json"));
                var content = new FormUrlEncodedContent(new[]
                {
                        new KeyValuePair<string, string>("username", username),
                        new KeyValuePair<string, string>("password", password),
                        new KeyValuePair<string, string>("grant_type", "password"),
                        new KeyValuePair<string, string>("device_id", deviceId),
                        new KeyValuePair<string, string>("client_id", clientId),
                    });
                var response = await client.PostAsync(string.Empty, content);
                if (response.StatusCode == System.Net.HttpStatusCode.OK)
                {
                    return await response.Content.ReadAsStringAsync();
                }
                else
                {
                    //return null if unauthenticated
                    return null;
                }
            }
        }

        public JObject DecodePayload(string token)
        {
            var parts = token.Split('.');
            var payload = parts[1];

            var payloadJson = Encoding.UTF8.GetString(Base64UrlDecode(payload));
            return JObject.Parse(payloadJson);
        }

        public ClaimsIdentity CreateIdentity(bool isAuthenticated, string userName, dynamic payload)
        {
            //decode the payload from token
            //in order to create a claim            
            string userId = payload.nameid;
            string[] roles = payload.role.ToObject(typeof(string[]));

            var jwtIdentity = new ClaimsIdentity(new JwtIdentity(
                isAuthenticated, userName, DefaultAuthenticationTypes.ApplicationCookie
                    ));
            
            //add user id
            jwtIdentity.AddClaim(new Claim(ClaimTypes.NameIdentifier,userId));
            //add roles
            foreach (var role in roles)
            {
                jwtIdentity.AddClaim(new Claim(ClaimTypes.Role, role));
            }
           
            return jwtIdentity;
        }

        private byte[] Base64UrlDecode(string input)
        {
            var output = input;
            output = output.Replace('-', '+'); // 62nd char of encoding
            output = output.Replace('_', '/'); // 63rd char of encoding
            switch (output.Length % 4) // Pad with trailing '='s
            {
                case 0: break; // No pad chars in this case
                case 2: output += "=="; break; // Two pad chars
                case 3: output += "="; break; // One pad char
                default: throw new System.Exception("Illegal base64url string!");
            }
            var converted = Convert.FromBase64String(output); // Standard base64 decoder
            return converted;
        }
    }


    public class JwtIdentity : IIdentity
    {
        private bool _isAuthenticated;
        private string _name;
        private string _authenticationType;

        public JwtIdentity() { }
        public JwtIdentity(bool isAuthenticated, string name, string authenticationType)
        {
            _isAuthenticated = isAuthenticated;
            _name = name;
            _authenticationType = authenticationType;
        }
        public string AuthenticationType
        {
            get
            {
                return _authenticationType;
            }
        }

        public bool IsAuthenticated
        {
            get
            {
                return _isAuthenticated;
            }
        }

        public string Name
        {
            get
            {
                return _name;
            }
        }
    }
}

For more information about JSON Token, please go to http://jwt.io/introduction/

Since, we are using username instead of email for login, modify the LoginViewModel from AccountViewModel. Replace the Email property with Username

    public class LoginViewModel
    {
        [Required]
        [Display(Name ="Username")]
        public string Username { get; set; }

        [Required]
        [DataType(DataType.Password)]
        [Display(Name = "Password")]
        public string Password { get; set; }

        [Display(Name = "Remember me?")]
        public bool RememberMe { get; set; }
    }

Modify the Login View (Login.cshtml) as follows

@using JWTFrontEnd.Models
@model LoginViewModel
@{
    ViewBag.Title = "Log in";
}

<h2>@ViewBag.Title.</h2>
<div class="row">
    <div class="col-md-8">
        <section id="loginForm">
            @using (Html.BeginForm("Login", "Account", new { ReturnUrl = ViewBag.ReturnUrl }, FormMethod.Post, new { @class = "form-horizontal", role = "form" }))
            {
                @Html.AntiForgeryToken()
                <h4>Use a local account to log in.</h4>
                <hr />
                @Html.ValidationSummary(true, "", new { @class = "text-danger" })
                <div class="form-group">
                    @Html.LabelFor(m => m.Username, new { @class = "col-md-2 control-label" })
                    <div class="col-md-10">
                        @Html.TextBoxFor(m => m.Username, new { @class = "form-control" })
                        @Html.ValidationMessageFor(m => m.Username, "", new { @class = "text-danger" })
                    </div>
                </div>
                <div class="form-group">
                    @Html.LabelFor(m => m.Password, new { @class = "col-md-2 control-label" })
                    <div class="col-md-10">
                        @Html.PasswordFor(m => m.Password, new { @class = "form-control" })
                        @Html.ValidationMessageFor(m => m.Password, "", new { @class = "text-danger" })
                    </div>
                </div>
                <div class="form-group">
                    <div class="col-md-offset-2 col-md-10">
                        <div class="checkbox">
                            @Html.CheckBoxFor(m => m.RememberMe)
                            @Html.LabelFor(m => m.RememberMe)
                        </div>
                    </div>
                </div>
                <div class="form-group">
                    <div class="col-md-offset-2 col-md-10">
                        <input type="submit" value="Log in" class="btn btn-default" />
                    </div>
                </div>
                <p>
                    @Html.ActionLink("Register as a new user", "Register")
                </p>
                @* Enable this once you have account confirmation enabled for password reset functionality
                    <p>
                        @Html.ActionLink("Forgot your password?", "ForgotPassword")
                    </p>*@
            }
        </section>
    </div>
    <div class="col-md-4">
        <section id="socialLoginForm">
            @Html.Partial("_ExternalLoginsListPartial", new ExternalLoginListViewModel { ReturnUrl = ViewBag.ReturnUrl })
        </section>
    </div>
</div>

@section Scripts {
    @Scripts.Render("~/bundles/jqueryval")
}

Likewise, we should also modify the action at the controller side

        [HttpPost]
        [AllowAnonymous]
        [ValidateAntiForgeryToken]
        public async Task<ActionResult> Login(LoginViewModel model, string returnUrl)
        {
            if (!ModelState.IsValid)
            {
                return View(model);
            }

            // This doesn't count login failures towards account lockout
            // To enable password failures to trigger account lockout, change to shouldLockout: true
            var result = await SignInManager.PasswordSignInAsync(model.Username, model.Password, model.RememberMe, shouldLockout: false);
            switch (result)
            {
                case SignInStatus.Success:
                    return RedirectToLocal(returnUrl);
                case SignInStatus.LockedOut:
                    return View("Lockout");
                case SignInStatus.RequiresVerification:
                    return RedirectToAction("SendCode", new { ReturnUrl = returnUrl, RememberMe = model.RememberMe });
                case SignInStatus.Failure:
                default:
                    ModelState.AddModelError("", "Invalid login attempt.");
                    return View(model);
            }
        }

Override the PasswordSignInAsync at IdentityConfig.cs

        public override async Task<SignInStatus> PasswordSignInAsync(string userName, string password, bool isPersistent, bool shouldLockout)
        {
            string uri = "<authorization server end point";
            string clientId = "<client id / audience id from authorization server";
            var jwtProvider = Providers.JwtProvider.Create(uri);
            string token = await jwtProvider.GetTokenAsync(userName, password, clientId, Environment.MachineName);
            if (token == null)
            {
                return SignInStatus.Failure;
            }
            else
            {
                //decode payload
                dynamic payload = jwtProvider.DecodePayload(token);
                //create an Identity Claim
                ClaimsIdentity claims = jwtProvider.CreateIdentity(true, userName, payload);

                //sign in
                var context = HttpContext.Current.Request.GetOwinContext();
                var authenticationManager = context.Authentication;
                authenticationManager.SignIn(claims);

                return SignInStatus.Success;
            }            
        }
}

Now we are ready to test our application. Run and enter username and password then click login.

A Server Error is raised, right? Well, yes that is expected because of the anti-forgery mechanism employed by MVC (@Html.AntiForgeryToken()) and our claims did not contain an identity provider.

A claim of type ‘http://schemas.xmlsoap.org/ws/2005/05/identity/claims/nameidentifier&#8217; or ‘http://schemas.microsoft.com/accesscontrolservice/2010/07/claims/identityprovider&#8217; was not present on the provided ClaimsIdentity. To enable anti-forgery token support with claims-based authentication, please verify that the configured claims provider is providing both of these claims on the ClaimsIdentity instances it generates. If the configured claims provider instead uses a different claim type as a unique identifier, it can be configured by setting the static property AntiForgeryConfig.UniqueClaimTypeIdentifier.

Let’s modify Global.asax.cs to tell MVC to use the userid as the token for anti-forgery.

using System.Security.Claims;
using System.Web.Helpers;
using System.Web.Mvc;
using System.Web.Optimization;
using System.Web.Routing;

namespace JWTFrontEnd
{
    public class MvcApplication : System.Web.HttpApplication
    {
        protected void Application_Start()
        {
            AreaRegistration.RegisterAllAreas();
            FilterConfig.RegisterGlobalFilters(GlobalFilters.Filters);
            RouteConfig.RegisterRoutes(RouteTable.Routes);
            BundleConfig.RegisterBundles(BundleTable.Bundles);

            //set the antiforgery claim to user id
            AntiForgeryConfig.UniqueClaimTypeIdentifier = ClaimTypes.NameIdentifier;
        }
    }
}

Great, our login is now working!
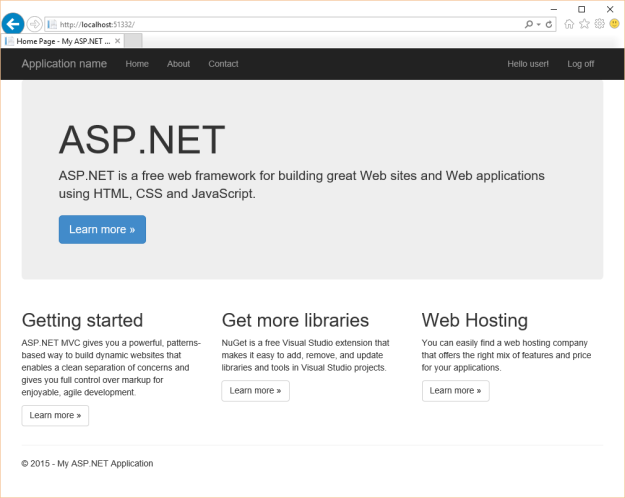
step4

Let us check if the authentication and authorization is working. Decorate the action Contact with Authorize.

using System.Web.Mvc;

namespace JWTFrontEnd.Controllers
{
    public class HomeController : Controller
    {
        public ActionResult Index()
        {
            return View();
        }

        public ActionResult About()
        {
            ViewBag.Message = "Your application description page.";

            return View();
        }

        [Authorize(Roles ="admin")]
        public ActionResult Contact()
        {
            ViewBag.Message = "Your contact page.";

            return View();
        }
    }
}

Note: An admin role is included in the account I am testing.
Click Contact from the menu. Because, the action needs authentication, we are directed to login.
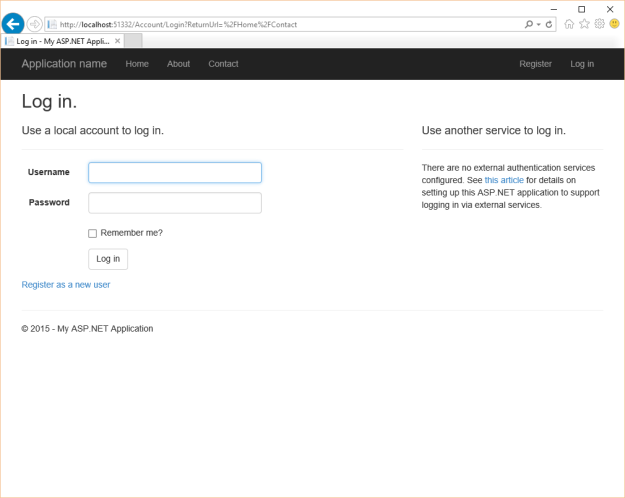
step5

Login and perfect, we can now access the Contact view.

step4

Authentication and Authorization is now provided by an external Authorization Server.

In my next blog, we will add refresh token and save the JWT to consume an external ASP.NET Web Api from an ASP.NET MVC as front-end.

Download the full source code here.

System.IO.IOException: Unable to read data from the transport connection: An existing connection was forcibly closed by the remote host.

I have a helper method below that uses the new HttpClient Class introduced in .NET 4.5 as shown below.

public static async Task<HttpResponseMessage> GetWebRequestAsync(string uri)
{
    using (var httpClient = new HttpClient())
    {
         //set Accept headers
         httpClient.DefaultRequestHeaders.TryAddWithoutValidation("Accept", "text/html,application/xhtml+xml,application/xml,application/json");
         //set User agent
         httpClient.DefaultRequestHeaders.TryAddWithoutValidation("User-Agent", "Mozilla/5.0 (Windows NT 6.3; WOW64; Trident/7.0; EN; rv:11.0) like Gecko");
         httpClient.DefaultRequestHeaders.TryAddWithoutValidation("Accept-Charset", "ISO-8859-1");
         return = await httpClient.GetAsync(uri); 
    }
}

I tested it in both http and https scenarios with different URLs and they passed with flying colors. Satisfied, I pointed my URL to one of my production websites for final testing. The production website uses https protocol. Of course, my expectation should be no different from my testing but boom, I got this error!

GetWebRequestAsyncTest threw exception: 
System.AggregateException: One or more errors occurred. --->
System.Net.Http.HttpRequestException: An error occurred while sending the request. ---> 
System.Net.WebException: The underlying connection was closed: An unexpected error occurred on a send. --->
System.IO.IOException: Unable to read data from the transport connection: An existing connection was forcibly closed by the remote host. ---> 
System.Net.Sockets.SocketException: An existing connection was forcibly closed by the remote host

Switching to http protocol did not threw any exception so I was able to isolate that the culprit was https protocol. However, It worked for other website using https and not in my production website. And that made me googling for a day without resolving the problem.

The next day, I turned my attention to my production website and reviewed all the configurations done with the web server particularly interested with https protocol. I noticed that my web server was configured to accept TLS 1.2 only. It was configured this way for PCI compliance.

That gave me a hint that led me to find out that HttpClient is connecting  using TLS 1.0.  I cannot find any documentation that this is the default but I suspect it is because SSL 3.0 and below is already deprecated.

Armed with this information, I now have to force my HttpClient to connect using TLS 1.2 first then TLS 1.1 then TLS 1.0 so that it can support three versions of TLS. And that gave me the ServicePointManager.SecurityProtocol configuration. So, simply with a single line of code, it worked!. See code below

public static async Task<HttpResponseMessage> GetWebRequestAsync(string uri)
{
    using (var httpClient = new HttpClient())
    {
          //make sure to use TLS 1.2 first before trying other version
          ServicePointManager.SecurityProtocol = SecurityProtocolType.Tls12 | SecurityProtocolType.Tls11 | SecurityProtocolType.Tls;

         //set Accept headers
         httpClient.DefaultRequestHeaders.TryAddWithoutValidation("Accept", "text/html,application/xhtml+xml,application/xml,application/json");
         //set User agent
         httpClient.DefaultRequestHeaders.TryAddWithoutValidation("User-Agent", "Mozilla/5.0 (Windows NT 6.3; WOW64; Trident/7.0; EN; rv:11.0) like Gecko");
         httpClient.DefaultRequestHeaders.TryAddWithoutValidation("Accept-Charset", "ISO-8859-1");
         return = await httpClient.GetAsync(uri); 
    }
}

I hope you will find this helpful for your next use of HttpClient class. Happy coding!

Don’t forget that Response.End()

While adding some few enhancement on an old project, ASP.NET webform-based API, I was having problem removing the HTML tag output from the API. I have written this project five years ago and I know that you can write a response from an ASPX page without the HTML tags. I simply should use the Response.Clear() or Response.ClearContent(). Response.Clear() is not working?!?!?!

Here is the code that does not output what I want.

protected void Page_Load(object sender, EventArgs e)
{
     //Erases any buffered HTML output
     Response.Clear();
     Response.Write("Hello, API.");
}

If you view the source of the output,

Hello, API.


<!DOCTYPE html>
<html xmlns="http://www.w3.org/1999/xhtml">
    <head>
        <title></title>
    </head>
    <body>
<form method="post" action="NewApi.aspx" id="form1">
<div class="aspNetHidden">
                <input type="hidden" name="__VIEWSTATE" id="__VIEWSTATE" value="YpQKYTR2RvrptiLm1lmMsAJwJ//a75ZBpZNGl/rMG5KPseJDjWPtzsRumtqz2U5cLtK9ilxYWrQxgjcxR9VyjfQzP4W4MK8Xgdd753gdoh4=" />
            </div>
<div></div>
<div class="aspNetHidden">
                <input type="hidden" name="__VIEWSTATEGENERATOR" id="__VIEWSTATEGENERATOR" value="F48D0FAC" />
            </div>
        </form>
        <!-- Visual Studio Browser Link -->
        <script type="application/json" id="__browserLink_initializationData">
    {"appName":"Chrome","requestId":"dacea9113ab74bf7a121e7e8599c93a5"}
</script>
        <script type="text/javascript" src="http://localhost:52028/b08ad1d741774013a9875e2b2003daf7/browserLink" async="async"></script>
        <!-- End Browser Link -->
    </body>
</html>

Using my old arsenal of restarting and clearing cache did not work. So I did look up my old code and sure enough I forgot to write the most important line of code. The Response.End()

The working code

protected void Page_Load(object sender, EventArgs e)
{
     //Erases any buffered HTML output
     Response.Clear();
     Response.Write("Hello, API.");
     //Sends all currently buffered output
     //and stops the execution of the page
     Response.End();
}

And I got the correct output.

Hello, API.

So, don’t forget that Response.End();

C# Extension Methods

As defined by MSDN: Extension methods enable you to “add” methods to existing types without creating a new derived type, recompiling, or otherwise modifying the original type. It was introduced in .NET 3.5 at the same time with LINQ – which in turn uses Extensions. That’s why all of a sudden, you can now use LINQ against Enumerables even though those objects where never modified.

As defined by me: A very powerful feature that sometimes new developers forget, doesn’t care or doesn’t know about it or don’t quite understand how to create one.

Consider the following scenario. To secure your application credentials at runtime, you decided to use System.Security.SecureString. The content of the SecureString is encrypted while in memory. Read the documentation about SecureString. You cannot assign a string directly to SecureString. It only has a method of AppendChar that accepts one character at a time. So to assign a string, you have to do this.

string s = "MyPassword";
System.Security.SecureString secureString = 
  new System.Security.SecureString();
foreach(char c in s)
{
    secureString.AppendChar(c);
}

Imagine you have to do this over and over in different classes in your code. So you decided to create a public static method and call it every time like this.

public static System.Security.SecureString GetSecureString(string s)
{
    System.Security.SecureString secureString = new System.Security.SecureString();
    foreach (char c in s)
    {
        secureString.AppendChar(c);
    }
    return secureString;
}
static void Main(string[] args)
{
    string unsecuredPassword = "Password123";
    var securePassword = GetSecureString(unsecuredPassword);
}

How about doing it in a more elegant way. Like for example, when you convert the string into lower case, you would do this.

string myString = "Hello World";
string lower = myString.ToLower();

And to convert to SecureString, you would do this.

string unsecuredPassword = "Password123";
var securePassword = unsecuredPassword.ToSecureString();

If you add ToSecureString() into your existing string, it will not compile. Because ToSecureString() is not a method or extension of string by default. We have to create an extension method to be able to do this.

To create an extension

  1. Create a public static class
  2. Create a public static method with the parameter you wish to extend. In this example,  the string object.
  3. Put the this keyword before the object you are extending.
  4. Don’t forget the this

See example below.


public static class StringExtension
{
   public static System.Security.SecureString ToSecureString(this String s)
   {
       System.Security.SecureString secureString = 
       new System.Security.SecureString();
       foreach(char c in s)
       {
           secureString.AppendChar(c);
       }
       return secureString;
   }
 }

And now, to use it…


 class Program
 {
     static void Main(string[] args)
     {
         string unsecuredPassword = "Password123";
         var securePassword = unsecuredPassword.ToSecureString();
         Console.Read();
     }
 }
        

Creating extension methods is easy after all. But don’t overdo it! Enjoy coding!

C# 5.0 Asynchronous Programming with async and await

The introduction of async and await in C# 5.0 makes asynchronous programming a breeze. In contrast with traditional asynchronous technique that is complicated. However, you need to understand how the new technique works and how to implement it properly.

First, lets see the code snippet below. A method that returns something.

        async Task<int> GetTotalCustomerAsync()
        {
            //the data to be returned
            int result = 0;
            using (SqlConnection conn = new SqlConnection("..."))
            {
                using (SqlCommand cmd = new SqlCommand("....", conn))
                {
                    //open the connection asynchronously
                    await conn.OpenAsync();
                    //execute the query
                    Object obj = await cmd.ExecuteScalarAsync();
                    //convert the result
                    if(obj!=null)
                    {
                        int.TryParse(obj.ToString(), out result);
                    }                    
                }
            }
            //return the result
            return result;
        }

Pointers:

  1. The method signature includes an async modifier
  2. The method must not return void. Except when you’re writing an async event handler.
  3. The method must return Task<TResult> or Task if it returns nothing.
  4. The method must have at least one await operator.
  5. By convention, the method ends with Async suffix. So that you will easily identify that the method is asynchronous and can be awaitable as you can see in the succeeding example.
  6. await can only be used to an asynchronous method provided by the type. e.g. SqlCommand.ExecuteNonQueryAsync(). Hence, you cannot await SqlCommand.ExecuteNonQuery();

Just follow the pointers and method signature above and you can implement an asynchronous programming technique easily. As stated in Pointers #4, there must be at least one await operator. The next question now is what if I have my own method but I can’t use the await operator inside because there is nothing asynchronous inside that I can call and I want that my method to be asynchronous? An example would be:

        double Compute()
        {
            double result = 0;
            //very extensive computation with I/O and it may take a while
            //the computed value is stored to result
            return result;
        }

        void MyMethod()
        {
            double finalResult = Compute();
        }

        //decorating with async and await like this
        //will not compile at all as noted in the pointers above
        //because Compute is not async and awaitable
        async Task MyMethod()
        {
            double finalResult = await Compute();
        }


TaskCompletionSource to the rescue. As defined by MSDN, “Represents the producer side of a Task unbound to a delegate, providing access to the consumer side through the Task property.” It is a little bit hard to understand but applying it in the example, I hope you can grasp the idea.

        Task<double> ComputeAsync()
        {
            double result = 0;

            //create a task completion source
            //the type of the result value should be the same
            //as the type in the returning Task            
            TaskCompletionSource<double> taskCompletionSource = new TaskCompletionSource<double>();

            //create and run the extenstive computation in background task
            //to complete taskCompletionSource.Task
            Task.Run(() =>
              {
                  try
                  {
                      //very extensive computation with I/O and it may take a while
                      //the computed value is stored to result
                      //....                      
                      //set the result to TaskCompletionSource
                      taskCompletionSource.SetResult(result);
                  }
                  catch (Exception ex)
                  {
                      //pass the exception to TaskCompletionSource
                      //for proper handling
                      taskCompletionSource.SetException(ex);
                  }
              }
            );
            //return the Task
            return taskCompletionSource.Task;
        }

Implementing an asynchronous programming is now easier than before. Likewise, you can make your own method to run asynchronously easily, too. However, it doesn’t mean that you have to convert all your methods to run asynchronously. In my own experience, I only convert those methods that require I/O and CPU extensive tasks that may complete for more than 50 milliseconds.